Adding MCP Server
The Model Context Protocol (MCP) server enables access to Foglight AI Insights functionality. You can add and manage MCP servers directly from the Foglight Client UI.
MCP servers can be used outside of development environments, but this usage is not supported as a feature.
This section covers the following key areas:
Security for MCP Server Connections
All MCP server connections are secured using encryption and authentication mechanisms provided by QTDMP. For detailed security information, refer Getting Started.
Security for On-Premises MCP Server Connections
When Foglight AI Insights connects to an on-premises Foglight MCP Server, the connection is secured as follows:
- Encrypted transport — Communication between Foglight AI Insights and the on-premises MCP Server is protected using TLS (HTTPS), so data in transit is encrypted.
- Authenticated requests — Every request is authenticated. Foglight AI Insights presents credentials (an OAuth token or a Foglight Auth-Token) that the MCP Server validates against the Foglight Management Server (FMS). Only requests that map to an existing Foglight user are authorized, and the MCP Server exposes read-only access to monitoring data.
- No inbound access to your monitored systems — The MCP Server retrieves data from the FMS on your behalf; Foglight AI Insights never connects directly to your databases or hosts.
OAuth authentication for on-premises MCP Servers is optional. When OAuth is used, the connection from Foglight AI Insights currently assumes a constant client ID of lumina. If you do not use OAuth, connections are authenticated using a Foglight Auth-Token instead.
Accessing MCP Servers
To access the MCP Servers management page:
- Navigate to Foglight > Foglight MCP Servers in QTDMP
- The MCP Servers page displays all your configured servers and provides an Add Server button to configure new servers.
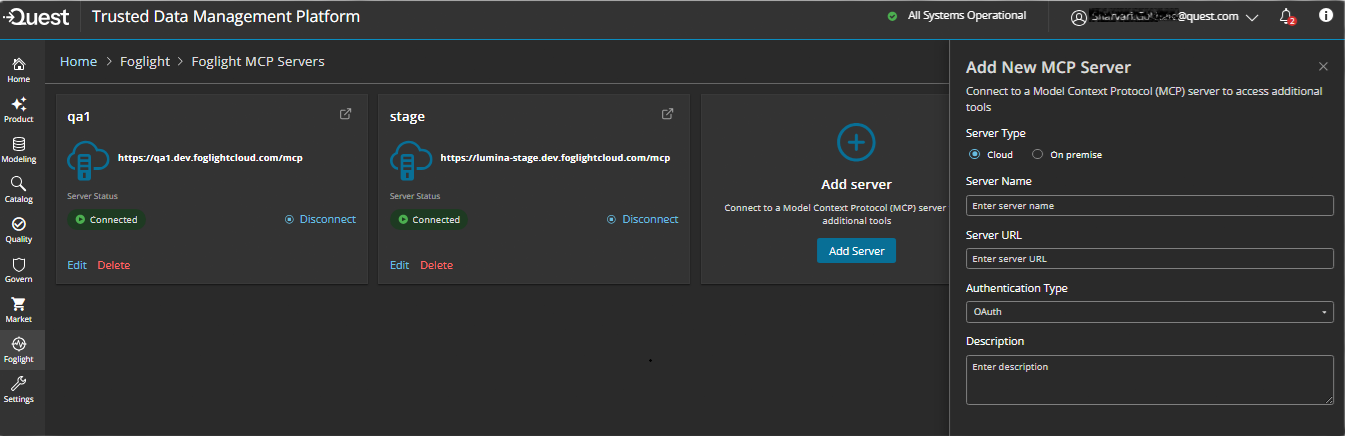
Adding a New MCP Server
Before adding MCP servers, ensure you are logged in to QTDMP with appropriate permissions. Refer to Getting Started with AI Insights for authentication and access requirements.
To add a new MCP server, click the Add Server button. The “Add New MCP Server” dialog opens. Follow these steps to configure your server:
Select Server Type - At the top of the dialog, choose the deployment type:
- Cloud (default) - Select this option for cloud-hosted MCP servers.
- On-premise - Select this option to connect to an MCP Server you install on-premises.
Enter Server Name - In the Server Name field, enter a unique name to identify your MCP server:
- Examples:
qa,production-mcp,dev-server - This name will appear in your MCP Servers list
- Examples:
Provide the connection details - The fields shown depend on the server type you selected:
- Cloud - In the Server URL field, enter the full URL of your MCP server (for example,
https://example.foglightcloud.com/mcp). Make sure the URL is correct and accessible. - On-premise - From the Operating System list, select the operating system of the host where you will install the MCP Server (Windows or Linux). This determines which installer is downloaded. No Server URL is required at this stage, but you must provide a name for the connection. The name can be any string that is no longer than 25 characters.
- Cloud - In the Server URL field, enter the full URL of your MCP server (for example,
Select Authentication Type - From the Authentication Type dropdown, choose your authentication method:
- OAuth (default and recommended) - Automatically uses your Foglight account credentials.
- API Key - Requires you to enter an authentication token.
- If API Key is selected, enter your authentication token in the API Key field.
- Click the eye icon to show/hide the token value.
- For information on creating and obtaining authentication tokens, see the REST API Authentication guide.
Add Description (Optional) - In the Description field, optionally add notes about your MCP server:
- Example: “QA environment server” or “Production MCP instance”
Save Configuration - Click one of these buttons:
- Add (Cloud) - Save and register your MCP server configuration.
- Add & download (On-premise) - Save the configuration and automatically download the installer for the selected operating system.
- Cancel - Close the dialog without saving changes
For Cloud servers, after successfully adding the server, it appears in your MCP Servers list with a Connected status indicator (green checkmark).
For on-premises servers, after clicking Add & download, complete the following additional steps to connect the server:
- Install the MCP Server on your host using the downloaded installer.
- After the MCP Server is installed, it appears in your MCP Servers list. You should then go and connect to it. After that, you can use this server when asking questions in AI Insights Chat.
On-premises only: The installer download starts automatically after the MCP Server is added, and the server remains disconnected until installation is complete. The installer can only be generated once per MCP Server. If it is lost, you must delete the MCP Server and recreate it to generate a new installer.
Managing MCP Servers
After adding an MCP server, it appears in the MCP Servers list on the Foglight MCP Servers page.
Permission Levels: All Foglight AI Insights users, including administrators, can view and review MCP server configurations and use them for queries. Users with the Foglight AI Insights Administrator role have additional permissions to add, edit, or delete MCP servers. Contact your organization administrator if you need administrative permissions to manage MCP servers.
Editing an MCP Server
To modify an existing MCP server configuration:
- Click the Edit button next to the MCP server entry
- The “Add New MCP Server” dialog opens with your current settings
- Update any of the configuration fields
- Click Add to save your changes
Deleting an MCP Server
To remove an MCP server from your configuration:
- Click the Delete button (shown in red) next to the MCP server entry
- Confirm the deletion when prompted
- The MCP server will be removed from the list and will no longer be accessible for AI Insights queries
Each server provides access to the tools the server provides. For Foglight MCP servers, each server provides access to a different FMS.
Deleting an MCP server will disconnect it from Foglight AI Insights and make it unavailable for queries. If you only want to temporarily disable a server, use the Disconnect button instead.

